Outdoor Sauna Site Preparation: What to Do Before Your Kit Arrives
Spot, permits, power, base and delivery day, in the order to do them.
Ordering your sauna is the exciting part. The weeks that follow are where the real groundwork happens, and a little planning now makes delivery day and assembly go smoothly.
Good outdoor sauna site preparation comes down to doing things in the right order. Choose the spot before you build the base. Plan your electrical route before the base goes in. Know how your crates will come off the truck before the truck shows up. Skip a step, and you can end up waiting on an electrician with a sauna already in the way, or staring at a crate that can't reach the backyard.
This guide walks you through each stage, from the day you order to the day your kit arrives. Our complete outdoor sauna guide covers the bigger picture, from sauna styles and wood to heaters and bases.
- Work in order: pick the spot and check permits, plan power or firewood, build the base, then plan delivery day
- Use your local locate service before anyone digs, and check whether the electrical work needs its own permit
- Set your sauna on a level, well-drained base, never on grass or bare soil
- Most kit deliveries are curbside, so confirm the delivery method and choose how your crates will come off the truck
- Inspect every crate before you sign, and write down any damage clearly
Pick the Spot and Check the Rules
Pick a level, well-drained spot that your crates can reach from the driveway. Then check with your local authorities about permits and setbacks, and use your local locate service before anyone digs.
Start with the spot, because every later step depends on it. Look for ground that's level or close to it, drains well after rain, and sits clear of low branches that can drop debris or rub the roof. Think about the walk from the house on a January night, too. Closer is nicer. If you're going electric, the closer the sauna sits to your electrical panel, the simpler the wiring tends to be. If you're going wood-fired, read the chimney clearances in your heater manual before you settle on a spot (more on that in section 03).
Think beyond the footprint
Before finalizing the location, leave room for:
• The door to open comfortably
• Heater and chimney servicing
• Snow clearing
• Roof runoff
• An exterior step or landing
• Safe nighttime access
• Moving replacement parts or equipment in later
Measure the path
Your crates arrive at the curb, not in the backyard. Walk the route from the end of your driveway to the site and check gate widths, side yards, slopes, steps, and anything overhead like wires or branches. Crate sizes vary by model, so ask your dealer what to expect for yours.
Check the rules
Building, electrical, zoning and fire requirements vary by municipality, province or state, and installation. Check with your local authorities before construction begins. Many towns let you build a small shed without a building permit, but a sauna may not count as a shed. Ask about setbacks from property lines too. If you have an HOA, condo board or strata, check their rules as well.
Electrical work may require a separate permit or inspection even when the sauna structure itself does not require a building permit.
Before anyone digs a trench or a base, buried gas, power and phone lines need to be located. In the U.S., contact 811. In Canada, use the utility-locate service for your province. Submit your request early and do not dig until the required locate responses are complete.
Electric Heater? Plan the Power Route Early
Book your electrician early and coordinate the electrical route before the base is completed. If conduit or an underground trench will pass beneath or beside the base, plan it before concrete, pavers or gravel go in. The final heater connection happens after the sauna and heater are installed.
Most residential LeisureCraft electric sauna heaters use a dedicated 240V circuit, with breaker and conductor requirements determined by the specific heater. The final electrical connection should be completed by a licensed electrician in accordance with the heater manufacturer's installation manual and local electrical requirements. Book early, because your electrician may need to pull a permit and schedule an inspection.
When you call, have your heater's manual handy. It sets the wire size and breaker the heater needs, and your electrician will want it. Ask them to check that your panel has room for a new circuit, too.
Many owners choose to run the power line underground. If you do, plan the trench and conduit around your base, ideally before any concrete, pavers or gravel go in. Your electrician can tell you where the conduit should run. That way nobody has to dig through a finished base later, or work around a sauna that's already in place.
The final hookup happens after assembly, once the heater is mounted. For help choosing the heater itself, see our sauna heater buying guide.
Wood-Fired? Plan for the Chimney, Firewood and Ash
A wood-burning heater needs no electrical hookup, but plan three things before the sauna is placed: where the chimney goes and what's around it, where your firewood will stay dry, and where the ash will go.
A wood-burning heater itself does not require an electrical hookup, although your sauna may still need electrical work for lighting or other accessories. It does bring its own prep.
The chimney
Your heater manual sets the clearances: how far the stove and chimney must sit from anything that can burn, and how the chimney exits the sauna. Read it before you pick the spot. Do not choose the final sauna location until you've confirmed the chimney configuration and required clearances for your specific heater, so trees, fences and other buildings near the chimney don't become a problem later. Depending on where you live, a wood-burning heater may also need a permit or a review by your local building or fire authority, and some insurers ask for an inspection. Check local burn rules and fire bans as well. Our guide to wood-burning sauna stoves covers clearances and certification in more detail.
Firewood and ash
You'll want seasoned, dry firewood on hand before your first fire, and a covered spot to keep it dry and off the ground close to the sauna. A cedar firewood storage barrel keeps split wood right where you need it. Plan a spot for ash, too: a metal container with a tight lid, kept away from the sauna, any deck, and the woodpile.
Split firewood stacked off the ground in a cedar storage barrel.
Build the Base
Your sauna needs a flat, level, well-drained base: compacted gravel, a concrete slab, pavers on gravel, or a deck that can carry the weight. Never set a sauna directly on grass or bare soil.
The base is what keeps your sauna level, dry and sound for years, so give it the attention it deserves. Have it finished before your kit ships.
Before building the base, check the assembly manual for your exact model and size. The base needs to meet at least the sauna's required footprint, and many owners make it larger to create a dry landing or cooldown area. Here are the four common options.
| Base | What it involves | Good to know |
|---|---|---|
| Compacted gravel | About 4" of compacted 3/4" clear stone | Drains naturally and is easy to level. The most popular choice for barrel and cabin saunas. |
| Concrete slab | A 4" slab | A permanent, low-maintenance option. |
| Pavers | Patio stones or pavers set on a compacted gravel base | The gravel underneath keeps them from shifting over time. |
| Deck | An existing or new deck | Must be able to carry the sauna's weight. Have a contractor check it if you're not sure. |
Typical LeisureCraft installations often use approximately 4 inches of compacted 3/4-inch clear stone or a 4-inch concrete slab, but site conditions, frost requirements and the sauna model can change what is appropriate. Follow your specific sauna manual and local construction requirements.
Whatever you choose, the base itself should be level, and the ground around it should slope slightly away so water drains clear. Barrel saunas rest on cradles, and those cradles need to sit level and in line with each other.
Never place a sauna directly on grass or bare soil. Moisture wicks up into the wood, and the ground settles unevenly over time. In cold climates, a well-drained, compacted base helps limit movement as the ground freezes and thaws. A local contractor can tell you what works best in your area. For more on bases and how they fit different sauna styles, see our complete outdoor sauna guide.
Not Sure What Base Your Sauna Needs?
Your local dealer can walk you through site prep for the model you ordered.
Choose How Your Crates Will Come Off the Truck
Most kit deliveries are curbside. Confirm the delivery method with your dealer and carrier, then decide before the truck arrives whether your crate will come off by liftgate, with rented equipment, or piece by piece.
Your sauna ships in sturdy custom-built crates. Smaller models usually ship in one crate, while larger saunas can come in two or three. Most residential kit deliveries are curbside, which means the crates are dropped where your driveway meets the road, but unloading arrangements depend on the shipment size, carrier and destination. Confirm the delivery method with your dealer and carrier before delivery day.
The carrier will call to book an appointment. Plan how you'll unload before the phone rings.
| Option | When it works | What you need |
|---|---|---|
| Liftgate | The crate is short enough and within the liftgate's weight limits | Nothing extra. The driver lowers it to your driveway. |
| Rented equipment | Larger or heavier crates that can't come off by liftgate | A forklift or skid steer, plus extension forks and straps |
| Unpack on the truck | No equipment available, and the carrier has agreed to it in advance | A cordless driver with a #2 Robertson bit and a few helpers. Expect an hour or two, depending on your model. |
| Terminal pickup | None of the above works for your site | Pick up the order at your local shipping terminal. Ask your dealer what you'll need. |
Never assume you'll be permitted to open or unload the crate while it is still on the truck. Confirm this with the carrier in advance.
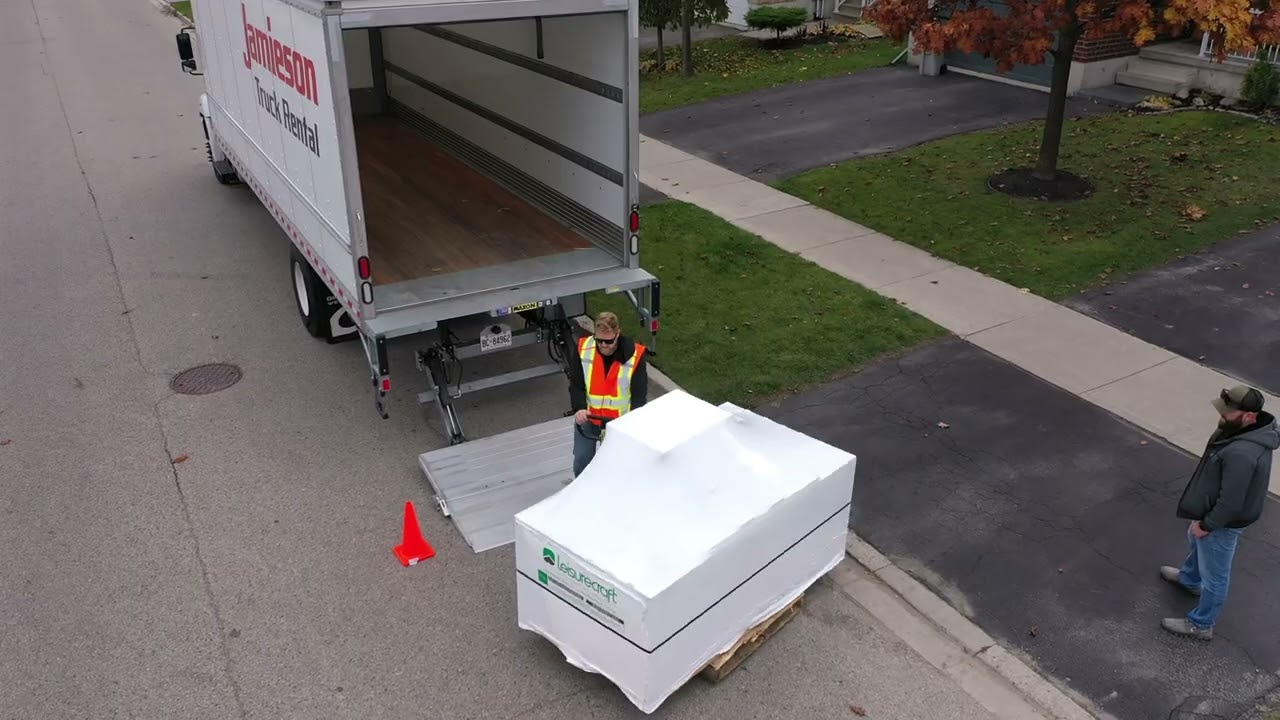
How a liftgate delivery works when your crate fits the truck's liftgate.

Unloading larger crates with rented equipment, or opening the crate and unloading piece by piece.
Delivery Day: Inspect, Unload and Keep Parts Dry
Walk around every crate before you sign. If anything looks damaged, write it clearly on the waybill, take photos, and send them to LeisureCraft and your dealer.
Before you sign anything, walk around each crate and look for damage to the outside. If you see any, take photos and write the damage on the waybill before you sign it. Be specific about what you see and where. A vague note like "subject to inspection" may not be enough if you need to make a claim later. Then share the photos with LeisureCraft and your dealer.
Once everything is signed, unload using the plan you confirmed with the carrier. If you're unpacking piece by piece, have your helpers ready before the truck arrives.
Until assembly day, keep the parts dry, covered and off the ground. When you're ready to open the crates, check everything against the parts list before you start building. Our sauna kit buying guide covers what to do if a part is missing or damaged.
The shipping crate typically remains with you after delivery, so plan whether you'll reuse the lumber or dispose of it once assembly is complete.
Inspect the kit before the driver leaves, and note any damage on the paperwork.
Your Pre-Delivery Checklist
Before your kit arrives, have the spot chosen, permits checked, locates done, your power or wood-fired plan in place, the base finished, and your unloading method confirmed.
Use this as a quick check before the carrier calls.
| Stage | Have this ready |
|---|---|
| Right after you order | Spot chosen, delivery path measured, permits and setbacks checked, locate requested |
| Electric heater | Licensed electrician booked, panel checked, electrical route planned before the base goes in |
| Wood-fired heater | Chimney plan from the heater manual, burn rules checked, seasoned firewood and dry storage, lidded metal ash container |
| Before building the base | Exact model footprint confirmed from the assembly manual |
| Before your kit ships | Base finished, level and well drained |
| When the carrier calls | Unloading method confirmed, helpers and tools lined up |
| Before the truck arrives | Access route cleared, snow, mud and weather conditions checked |
| Delivery day | Crates inspected, damage noted on the waybill, parts kept dry until assembly |
Frequently Asked Questions
Not necessarily. Some LeisureCraft heater instructions specifically state that a GFCI breaker should not be used. Your electrician should follow the installation manual for the exact heater and the electrical requirements that apply in your jurisdiction.
Your electrician will check this. If the panel is full or can't carry the extra load, the usual fixes are adding a subpanel or upgrading your electrical service. Either way, it's work to plan for before the sauna arrives.
You still have options. If the driver allows it, you can open the crate on the truck and hand bomb it, unloading each piece by hand. It's also worth asking the driver if they can lend a hand. If unloading isn't possible that day, the order may go back to the shipping terminal, where you can arrange equipment or pick it up yourself. Let your dealer know right away so they can help with next steps.
Check your specific model's assembly manual. At minimum, it needs to accommodate the full sauna footprint and support all cradles or floor sections evenly. Many owners make the base larger for a landing or cooldown area.
Potentially, if it is level, well drained and able to carry the sauna's weight. Check the model requirements and have a contractor assess the structure if there is any doubt.
There is no universal setback. Building, zoning and fire rules vary by location, and wood-burning heaters may introduce additional chimney and combustible-clearance requirements.
Planning Your Sauna Site?
Your local dealer knows your model and your area. Reach out with questions before the truck arrives.